Monday, November 29, 2010

Diamond Quilt

I've just completed a lovely baby quilt that happens to look very similar to a quilt I did earlier this year, Danielle's quilt, without the border.


 I wanted to give it a pieced back, which makes it fully reversible, I think.
This time instead of piecing each diamond from one large printed square and four smaller white squares (in Flying Geese fashion), I simply cut squares and arranged them with strips to form a diamond pattern.  It came together much quicker and used much less fabric.  This picture isn't lined up perfectly, but you get the idea.


And this is the finished product, fresh and crinkly from the dryer.  It's super soft and ready for snuggling! :)

Monday, November 1, 2010

Fresh and Funky- October

Here are the blocks I made for Cat.  She had us do some really fun blocks, and I got to work on my applique skills a little bit more!
 She sent out fabrics to represent the four seasons, and I got summer (which I happen to love).  She also asked that we use her owl print somewhere on each block, so I perched mine in the tree.
Since this block is all about summer, I figured I'd give her a few strawberries growing under the tree.
I also included a signature block that I forgot to photograph.  Oops.  I sent her some extra blocks for an earthquake quilt, as well.  Cat is from New Zealand and is making quilts for children affected by the recent earthquakes there.  

Thanks for such a fun block this month!

Monday, October 25, 2010

Stepping Stones Quilt

This quilt is a gift for another one of my childhood friends who recently had a little boy.  It uses mostly Riley Blake Wheels fabric, which is a really great line.  I do happen to love all things Riley Blake!
The piecing went much quicker than I had anticipated, which was a very nice surprise.
I quilted it with wide-spaced vertical lines to make it fluffier.
The back is solid brown with a pieced strip running through it.
The finished quilt measures approximately 46" x 57."

Friday, October 22, 2010

Quilting Day!

Yesterday, I finished a quilt top made of fabric from Riley Blake's Wheels line (and one fabric from Michael Miller).  Today I'll be doing the quilting.  I think some simple straight lines will be perfect!

Friday, October 15, 2010

Earthquake Blocks

A few weeks ago, Deb of Works in Progress asked her readers to help her make a quilt for a family who lost their home in the recent eathquake in New Zealand.  She asked for 12.5" blocks (although mine came out a bit smaller...) using red or blue.  Here are the blocks I sent her today.

There's still a little bit of time if you'd like to help.  There is more information here and here.

Have a nice weekend!

Tuesday, October 12, 2010

Back at it...

I haven't made a quilt in what seems like a very long time, but now I have a few baby quilts in the works. I've decided to plan the patterns well so I can post tutorials and specifics on each quilt (fabric requirements, etc.). I've been so bad about this, bit I'm trying to get better!

Tuesday, October 5, 2010

Dog Towels

Do your friends and/or family ever ask you to make things for them?  Mine do.  Sometimes they ask for some strange items, other times, simple ones.  This particular one is a bit strange, but quite useful!

A few weeks ago, my mom asked me to make some towels (or robes) for her dogs to wear after she gives them a bath.  She even made a prototype, if you will, out of an old dish towel, Fray Check, and Velcro.  

I used terry cloth for the towel, quilting cotton and Heat n Bond for the raw-edge appliqued circles, cord for the tie around the neck and Velcro to secure the flaps underneath the belly.  Here are some pictures of the finished towels in action.  She took them on her phone, so please excuse the quality.
Millie
Missy
I won't lie, the girls don't look thrilled, but I know my mom is enjoying her clean bathroom! :)

What do you make for your friends or family?  Have you had any interesting requests?

Wednesday, September 29, 2010

Monday, September 27, 2010

Wood Block Stamps

Ever since the day I read this post about wood block stamps on Design*Sponge, I have wanted to buy some and try it.  Yesterday, I was in Santa Fe with my husband and my in-laws, and I found these amazing wood block stamps.  I like to imagine that they were used for years in some exotic land to make beautiful and elaborate textiles.  I didn't get the story behind them, but maybe I'll ask the next time I go back.
I have a lot of projects going on right now, so I don't know when I'll find time to experiment with my wood blocks.  I am really excited to see what I can make with them.  Do you have any ideas or suggestions?

Happy Monday!

Thursday, September 23, 2010

Cuteness

This week, there is a great contest going on at Spoonflower.  The theme is Kawaii, or Japanese cuteness.  There are so many great designs to choose from, and you can vote for as many designs as you'd like.  Here's my entry:


Cute Mice by mandyd

I'd love your vote if you've got the time! :)  

Happy Thursday!

Wednesday, September 22, 2010

Tuesday, September 21, 2010

Checking In

I'm here!  I haven't blogged in a while because I just haven't had anything to say.  My sewing room has been relatively quiet these past few weeks.  I've stitched up a few things here and there, but no quilts.  I did make a "Binding Book," as I like to call it.  It is just a nice way to hold all the pieces I need for the hand work that I do to bind my quilts.  


Now I just need to make a quilt...

*Let me know if you'd like to know how to make your own binding book.  It's super easy.

Sunday, September 12, 2010

Reverse Applique- Take One

So, I am slowly but surely conquering (okay, just visiting) the world of applique.  This project was a simple one, although looking back, I should have done several things differently.  You live and learn, right?  
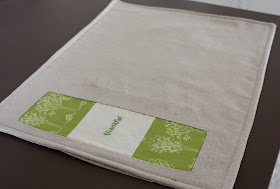
These placemats measure approximately 14" x 18."
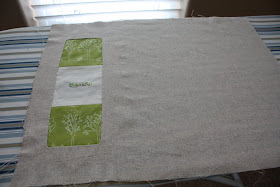
I pieced three 4" squares to make a strip and reverse appliqued it to the back of a piece of linen.  This is how I did the reverse applique:

1.  Mark the shape you want to leave open in the top fabric so that the bottom fabric shows through.
2.  Mark cutting lines in the center. Cut, clipping any curved edges that might need it.
3.  Fold the flaps under, and pin.
Right side
Wrong side
{and my nasty ironing board...I need to make a new cover for it!}
Put the wrong side of the top fabric up (as shown above).
I put a little Fray Check in the corners to keep them from fraying during this step.

4.  Using fusible web, fuse the bottom fabric to the wrong side of the opening, right side down.
5. Turn your fabric over and blind stitch the two layers together.  You can also top stitch around the opening if you want.
That's it!

There are several variations to this technique.  You can leave the edges raw instead of turning them under, especially if you are using a fabric that doesn't fray, like this one on a t-shirt from That Darn Cat.

Saturday, September 11, 2010

Today I Feel...


...for the many blessings I have been given that I don't deserve.
...for my country and the ones who have died to protect my freedom.
...for the chance to see my family this weekend.
...for my wonderful husband.

Wednesday, September 8, 2010

Fresh and Funky September

I finished my September blocks for our Fresh and Funky Bee today!  They are spiderweb blocks (tutorial from Quilt It) in the most lovely colors for Crystal.  
I had a lot of fun making the blocks, but I can't imagine the time it must take to make enough for a full quilt!  It makes me tired just thinking about it...  
This one is going to be a really beautiful quilt when she puts it all together, don't you think?

Sunday, September 5, 2010

Tote Bag Review

My mom recently asked me to make a tote bag for her that would stand up on its own.  Now, I call myself a quilter in the strictest sense of the word, i.e. I don't really sew items that aren't quilts.  I knew that I was going to have to find a pattern to follow...no winging this project or designing it as I go. 

Here's the result:
This bag's pattern comes from Amy Butler's book Little Stitches for Little Ones.  The book is really beautiful, and I just love flipping through the pages to see the lovely projects she has in there.
However, there are lots of words in the instructions and not nearly enough pictures, which made it a difficult project for me.  I had to learn a lot of things as I went along...things I would have known if I had been an experienced seamstress, no doubt.  Before two years ago, I don't think I had ever even touched a sewing machine.
It took several days for me to complete, but I have finally done it!  It feels good to know that I can successfully follow a pattern.  My last attempt to follow a pattern for something other than a quilt resulted in a pile of fabric in my trash can, and I don't throw away fabric; that's just how mad it made me!

It doesn't stand up as well as the photographs in the book indicate, but it's not totally floppy either.  I think I'll go ahead and call it a success.  I think...

Thursday, September 2, 2010

Nerd

My husband came home the other day, took one look at what I was doing and said, "I love you, but you're such a nerd."  We had a good laugh, because, well...he's right.  I can't deny it.  This was part of the scene that prompted his comment...
My "set"
See, I was trying to photograph some fabric I recently had printed, and I just couldn't get the right exposure.  So, I had to pull out the good old gray card.  I took a photography class about a year ago, and I just barely scratched the surface of the vast expanse of photography.  Gray cards help you to get a proper exposure on items that do not average out to "middle gray," like white fabric {Imagine me pushing my huge taped glasses up on my nose here}.  If you're interested, I can explain it to you a little better.  My husband was not interested.  It's okay.  I know I'm a nerd!

I've got some great pictures of all of my new fabric, though.  You can see them in my Etsy store if you're interested.
At least I'm a happy nerd!  Happy Thursday!