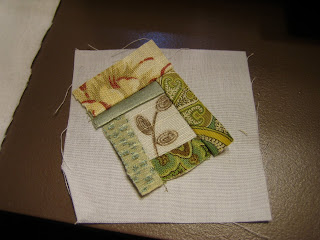
 Now say that title three times fast! I took some inspiration from Barbara Randle, and made my first crazy quilt block ever. Instead of making a throw or a bag, I decided to make a wrist pincushion. It's a wonderful thing to have, and I don't think I'll ever go back to my "Mater"--as I so lovingly called my old pincushion--again. It is an excellent way to use those swatches of home decor fabrics I have no need for but don't have the heart to throw away, either. If you'd like to make one, here's what I did...
Materials:
4"x4" scrap quilting cotton, muslin or other sturdy fabric for foundation
6 or more swatches home decor fabric cut into assorted 1" and 3/4" strips (3"-6" in length)
4.5"x15.5" fabric for arm band (can be longer or shorter to fit wrist)*
Velcro*
poly fill or other material for stuffing your pincushion
Note: I used 1/4" seam allowance unless otherwise specified.
*Instead of making a fabric band, you could use elastic, a plastic bracelet, etc.
1. Cut a 1.5" square from decorator fabric scraps for center piece (can be larger or smaller to accommodate print size or taste).
2. Sew the 1.5" square to the center of the 4"x4" piece of foundation fabric using a 1/8" seam allowance.

3. Paper piece the strips onto your foundation fabric. If you need more help, keep reading. If not, skip to step 4.
Take one strip of the home decor fabric and sew it to one side of the 1.5" square, right sides together.

You can cut your strips to the correct length before sewing them on, but I like to save time by sewing them on and then trimming the excess.
Fold the strip back so that the right sides of both fabrics are facing up. Press the seam open.

Continue attaching the strips in the same way, working your way around the center square and pressing your seams open.


4. Turn the block upside down so that the back of the foundation fabric is facing you. Sew around the edge of the foundation fabric to secure the paper piecing.

5. Trim the excess fabric from around the foundation. I even trimmed off a bit of the foundation fabric as well.

6. Embellish as desired. I used some embroidery stitches on my machine to sew over some of the seams and Perle 5 cotton for some hand stitching.


7. Place both 4"x4" squares with right sides together (the quilted square should actually be smaller by this point). Sew the squares together using a 1/4" seam allowance from the edge of your crazy quilted square. Be sure to leave a 1.5" opening for turning and stuffing your pincushion.
8. Make the wrist band.
Take your large piece of fabric and fold it in half lengthwise. Finger press and open. Now turn each long side in so that it lines up with the crease. Press.

Now fold the fabric in half lengthwise again. Press.

Sew lengthwise on both sides of the band using a 3/16" seam allowance.

Trim Velcro and arm band to desired size. The band should be about 1/2" to 1" longer than the desired finished length.
Fold over one short end of the band, place Velcro over fold, and attach Velcro by sewing on all sides. I just like to sew right near the edges. This secures the unfinished end as well.
(And, please excuse my horribly blurry photo!!)

**Turn the wristband over** so that your first piece of Velcro is facing the table and repeat with the other piece of Velcro. This will allow the Velcro to connect properly.
9. Trim the corners, and turn pincushion right sides out.

10. Sew wristband to the bottom of the pincushion by hand using a running stitch (or other stitch of your choice).


11. Stuff your pincushion and whip stitch the opening closed.

Congratulations, you did it!
Please let me know if you have questions by leaving a comment or sending me an email. I'd be glad to help in any way I can!


Wow - you put so much work and quilting into a pinchusion! I am very impressed and happy I found your blog =)
ReplyDeleteI just finished making this style of sewing for the 1st time and I love how it turned out. I made it as a Christmas gift for my mom who sews all the time. Thank you for sharing your design and having step by step pictures.
ReplyDelete