Wednesday, November 30, 2011

Nautical Quilt

My most recent finish was this precious nautical themed quilt.  This is the first quilt I've made with applique, and I don't know what took me so long!  It turned out to be easy, and it makes quite an impact!

`
I used this method with fusible interfacing (Pellon 911FF).  I secured it with top stitching.  I love that there are no raw edges, so it looks very polished.  I did cut away the bottom layer of fabric (navy) and interfacing from the back, which helped reduce bulk and make a softer finished product.


I used seersucker fabric for the large outer border, so it's very light and tactile.


I also embroidered right on the binding instead of attaching a separate label.  I will definitely be doing more of this in the future!


Thanks for stopping by!

Thursday, November 17, 2011

Texas T-Shirt Quilt

I just finished a t-shirt quilt for my cousin, Danielle.  I love that there are so many different colors and types of shirts.  It's fun being able to look at all the things she's been involved in over the years.


I had a really hard time choosing the border colors for this quilt, but I finally settled on orange and brown.  I backed it with brown fleece, so it's really soft on the back.  Fleece is also great because it's wide enough to cover the back with one solid piece (I used 2 1/2 yards).


The finished quilt measures 72.5" x 56.5". 

I took plenty of pictures as I was finishing the quilt, so I'll be posting Part 3 of my t-shirt quilt tutorial soon!

Wednesday, October 26, 2011

Modern Coin Quilt

I made this quilt a few months ago for a friend's new baby boy.  She and her husband are both very stylish and modern, so I tried to do my best to make a quilt to reflect their personalities.  


I love coin quilts because they go together quickly and look great when they're done!  


I did a pieced back with scraps from the front.


I think those tiny elephants are my favorite!


Thanks for stopping by!

Monday, September 19, 2011

Turtle Quilt

I recently finished this fun quilt for a client's grandson.  She asked for turtles, and I had a hard time finding something I liked.  So, I decided to make my own!


I had these little turtles printed by Spoonflower.  


As for the design, I was inspired by some great quilts I found on flickr, like this one and this one.  It's very simple, so the fabrics really stand out.


As always, I used scraps of fabric from the front to make the back.


So today's question is... 


What inspires your quilt designs?  For me, flickr (this group in particular) is a huge influence and inspiration.  There are so many talented people out there who post pictures of their beautiful quilts!

Sunday, August 21, 2011

1 Samuel Quilt

I recently had to opportunity to make a quilt for a friend to give as a gift to her cousin who finally conceived a child after years of infertility.  She had seen some of the fabric I had printed on Spoonflower, and she asked if I could design something for her quilt.  She wanted to include a few verses from 1 Samuel 1 - (27) I prayed for this child and the Lord has granted me what I asked of him.  (28) So now I give him to the Lord.  For his whole life he will be given over to the Lord.

Here's what I came up with...


I wanted to make the words script, so they would blend into the quilt until you get close to read them.


I used half-square triangles to make the diamonds.  I happen to love working with half-square triangles because you can do so many things them!  Not only can you make diamonds, but you can make stripes, pinwheels, stars, or you can just leave them as triangles.


I wanted to add in a section on the back that was a bit more bold with the words.


In the future, I really hope I can incorporate more Spoonflower fabric into my quilts.  The possibilities really are endless!  If you haven't tried Spoonflower yet, think about it!  You could come up with something really special!

Sunday, August 7, 2011

T-Shirt Quilt Tutorial - Part 2

Materials (Part 2 only)
Rotary Cutter, Mat
Interfaced T-Shirt Pieces (Completed in Part 1)
Sewing Machine and 1/4” Presser Foot
Coordinating Thread

Step 1- Decide on a general layout.

Lay your pieces out and play with designs.  Decide whether you would like to sew your shirts in rows or columns (or some of both).  

For columns, try your best to make each row from shirts with similar width of printed space.  For rows, they should be of a similar height.  If one piece is too small, you can always go back and add scraps to make it the right width/height.  


You can also add scraps to give your quilt a more random look.  Play with turning thin designs 90 degrees.  Decide where you need to add scraps. Interface the scraps and lay them in place.  Take into account the number of seams in each row or column.  You will lose about 1/2” at each seam.  


Step 2- Square up all pieces and trim to size.


To make columns: Working one column at a time, measure the width of all pieces in the column.  Decide on a width (exact measurement, like 14") to cut each piece so that the designs are not cut off. Leave at least 1/2” of unprinted space on each edge.  Square up each piece on all sides, and cut the width to the desired measurement.  

Each of the columns in this quilt is trimmed to a different width.  I tried to group similar sized shirts together. 


Once you have trimmed all the shirts to the correct width, lay them out again.  Begin trimming the height of the blocks so that your columns come out to roughly the same length.  Take into account that you will lose 1/2" in length with every seam.  In the picture below, the second column has only two seams, but the rest of them have three.  I just made sure to allow extra room for trimming at the bottom for the second row.


To make rows: Working one row at a time, measure the height of all pieces in the row.  Decide a height to cut all the pieces so that the designs are not cut off. Leave at least 1/2” of unprinted space on each edge. Square up each piece on all sides, and cut the height to the desired measurement. 

Once you have trimmed all the shirts to the correct height, lay them out again.  Begin trimming the width of the blocks so that your rows come out to roughly the same length.  Take into account that you will lose 1/2" in length with every seam.


For smaller pieces that will be joined together within a row or column (shown above), square them up first and sew them together.  Press the seams open. Treat this as one shirt.  Then trim down the rest of the shirts in the row or column to the correct size.


Step 3- Sew the rows or columns together.  

If you were working in columns, sew each column together (shown above).  Then, you can sew the columns together to complete the quilt top.  Trim the edges so that they are straight.

If you were working in rows, sew each row together.  Then, sew the rows together to complete the quilt top.  Trim the edges so that they are straight.


This particular quilt is made up of columns in the middle, and rows on the top and bottom.


At the end of all the trimming and sewing, you should end up with a quilt top.  You need to think about borders and if you want to add them.

I'll write about adding borders and finishing the quilt in Part 3!  Thanks for reading!

Saturday, July 30, 2011

Bumble Bee Quilt

Hi!  I'm still here, although I've been quiet here in blog land!  Yesterday, I finally finished this bumble bee themed quilt for a client's granddaughter.  


I used two fabrics from Spring Fling by David Walker for Free Spirit, and the rest are from my stash.  My favorite 'stashed' fabric in this quilt is Girl on a Tree Swing from Aneela Hoey's Sherbet Pips line.  It's just so cute!!


I quilted it in free motion loops.


I made disappearing nine patch blocks, which create a wonderful random pattern.


I know this will be the perfect quilt for a precious little girl!

I'll be posting Part 2 of my t-shirt quilt tutorial soon, so be sure to come back!

Saturday, July 16, 2011

T-Shirt Quilt Tutorial - Part 1

Hi there!  For all of you who want to learn how to make a t-shirt quilt, I'm going to tell you my secrets.  As always, I don't claim to know all there is to know about making t-shirt quilts.  I have made several, and I've learned plenty by doing it.  Trial by fire, if you will.  So, in order to keep you out of the proverbial fire, here's what I know.

Materials (Part 1 only!)
Pellon 911FF Featherweight Fusible Interfacing (any color)*
20-25 T-Shirts

Quilting Tools
Rotary Cutter
Cutting Mat & Ruler
6.5" Quilter's Square (optional)
Iron
Ironing Board
Press Cloth (optional)

*The amount of fusible interfacing you'll need will vary depending on the number/size of the shirts you're using.  I think it's always good to start with 5 or 6 yards if you don't want to buy a bolt.  I got a great deal on my bolt at Overstock.com.  It's nice not having to worry about running out...

Step 1- Cut.

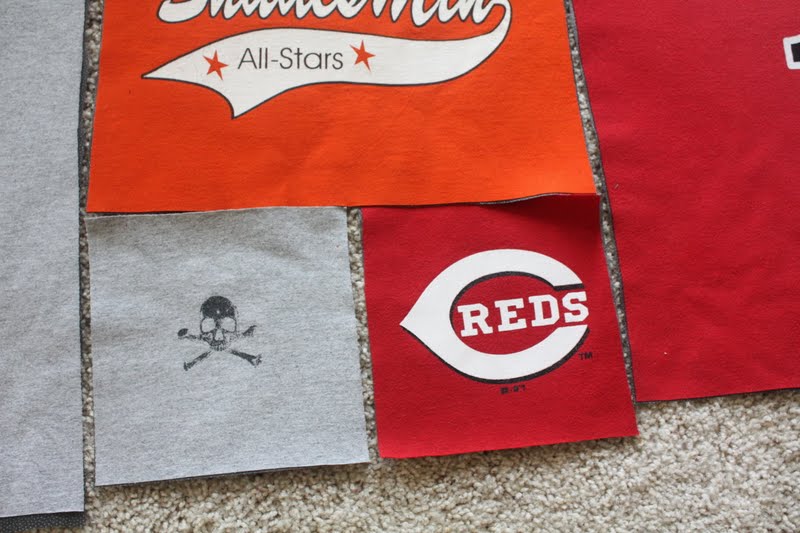
Use your rotary cutter, ruler and cutting mat to cut your t-shirts.  Be very generous in cutting.  You will trim and square up the shirts later.  Don't throw scraps away just yet.  You may need them later.

If I'm making the quilt for someone else, I ask them to designate which part(s) of each shirt they want me to use with painter's tape.

This shirt only has a design on the front, so I just cut through the whole shirt.  


This shirt has designs on both sides, so I split the sides and opened the shirt before I cut my rectangles.


You should end up with a pile of rectangles like this...


For cutting pockets, I sometimes use a 6.5" quilter's square.  It's easier for me if they're all the same size.

Step 2- Interface.


Lay out one t-shirt rectangle on your ironing board, right side down.  Iron the back of your rectangle.  Never iron the right side of a t-shirt.  The design will melt!


Trim the interfacing to the proper size.  


I don't usually trim all sides, but that's because I'm slightly lazy ;)  I also don't mind if a little glue gets on my ironing board.  It doesn't happen that often.  I'm careful where I put the iron.


Fuse the interfacing in place according to the manufacturer's instructions.  Don't worry about trimming the interfacing down for seam allowances.

You should use a press cloth over your interfacing if you want to keep your iron nice and clean.  I had a nasty accident with fusible fleece a while back, so being clean is not a possibility for my poor iron.  I do use a spray bottle to keep everything nice and cool.


I cut 6.5" squares of interfacing for the pockets.  The edges won't line up perfectly, but they come pretty close.  Like I said earlier, you will do lots of trimming later.


So, that should keep you busy for a while.  If you've finished this part, here's Part 2!